My Life in WordsAll about information and technology
|
|
Active-Directory plugin http://articlesss.com/article-directory-wordpress-plugin/ doesn't work very well on my system. I change the query sentence from $parent_cats = $wpdb->get_results("SELECT * FROM " . $wpdb->term_taxonomy . " term_taxonomy LEFT JOIN " . $wpdb->terms . " terms ON terms.term_id = term_taxonomy.term_id WHERE term_taxonomy.taxonomy = 'category' AND term_taxonomy.parent = 0 " . (count($exclude_cat) ? ' AND terms.term_id NOT IN (' . implode(',', $exclude_cat) . ') ' : '') . " ORDER BY terms." . $order_by); to $parent_cats = $wpdb->get_results("SELECT * FROM " . $wpdb->term_taxonomy . " term_taxonomy LEFT JOIN " . $wpdb->terms . " terms ON terms.term_id = term_taxonomy.term_id WHERE term_taxonomy.taxonomy = 'category' AND term_taxonomy.parent = 0 " . count($exclude_cat) ? ' AND terms.term_id NOT IN (' . implode(',', $exclude_cat) . ') ' : '' . " ORDER BY terms." . $order_by);
0 Comments
在墙内编译DC/OS源码的时候,遇到一个错误,就是由于golang.org不能访问,所以无法下载golang。尝试修改shell的proxy以及golang.org的IP都无法解决。因为浏览器用代理可以直接下载golang,所以手动下载了golang,并通过修改Dockerfile的方法,解决了这个问题。 $cd pkgpanda/docker/dcos-builder
查看Dockerfile --------------- ENV GOLANG_VERSION 1.8.3 ENV GOLANG_DOWNLOAD_URL https://golang.org/dl/go$GOLANG_VERSION.linux-amd64.tar.gz ---------------- 到此网址手动下载golang1.8.3.linux-amd64.tar.gz。 将此文件拷贝到pkgpanda/docker/dcos-builder目录中。 修改Dockerfile,使其不需要下载golang,而使用从host中拷贝的包 ------------------ 53 ENV GOLANG_VERSION 1.8.3 54 #ENV GOLANG_DOWNLOAD_URL https://golang.org/dl/go$GOLANG_VERSION.linux-amd64.tar.gz 55 #ENV GOLANG_DOWNLOAD_SHA256 1862f4c3d3907e59b04a757cfda0ea7aa9ef39274af99a784f5be843c80c6772 56 COPY /go$GOLANG_VERSION.linux-amd64.tar.gz /root/golang.tar.gz 57 58 #RUN curl -fsSL "$GOLANG_DOWNLOAD_URL" -o golang.tar.gz \ 59 # && echo "$GOLANG_DOWNLOAD_SHA256 golang.tar.gz" | sha256sum -c - \ 60 RUN tar -C /usr/local -xzf /root/golang.tar.gz \ 61 && rm /root/golang.tar.gz ---------------- 执行$git -C ./ commit -am TMP 否则会出现一下错误: Validation error when fetching sources for package: No local changse are allowed in the git_local_work base repository. Use `git -C ./ status` to see local changes. All local changes must be committed or stashed before the package can be built. One workflow (temporary commit): `git -C ./ commit -am TMP` to commit everything, build the package, `git -C ./ reset --soft HEAD^` to get back to where you were. 此时再进行编译就不会有问题了。 Vimdiff is unreadable on one of my system. This can be solved by adding the following to your ~/.vimrc:
highlight! link DiffText Todo Credit: https://stackoverflow.com/a/13370967/200234 EnvironmentUbuntu 16.04 462.libquantum Error /usr/lib/gcc/x86_64-linux-gnu/4.8/../../../x86_64-linux-gnu/libpthread.a(lowlevellock.o): In function `__lll_lock_wait_private': /builddir/build/eglibc-2.19/nptl/../nptl/sysdeps/unix/sysv/linux/x86_64/lowlevellock.S:78: multiple definition of `__lll_lock_wait_private' /usr/lib/gcc/x86_64-linux-gnu/4.8/../../../x86_64-linux-gnu/libc.a(libc-lowlevellock.o):(.text+0x0): first defined here /usr/lib/gcc/x86_64-linux-gnu/4.8/../../../x86_64-linux-gnu/libpthread.a(lowlevellock.o): In function `__lll_unlock_wake_private': /builddir/build/eglibc-2.19/nptl/../nptl/sysdeps/unix/sysv/linux/x86_64/lowlevellock.S:328: multiple definition of `__lll_unlock_wake_private' /usr/lib/gcc/x86_64-linux-gnu/4.8/../../../x86_64-linux-gnu/libc.a(libc-lowlevellock.o):(.text+0x30): first defined here collect2: error: ld returned 1 exit status specmake: *** [libquantum] Error 1 Solution: Remove -static from the 462 compilation options. 410.bwaves Error410.bwaves: copy 0 non-zero return code (exit code=11, signal=0) Solution: ulimit -s unlimited 416.gamess Error 416.gamess: copy 0 non-zero return code (exit code=11, signal=0) Solution: Remove -fstack-arrays from 416 complication options. 436.cactusADM: copy 0 non-zero return code (exit code=4, signal=0)Solution: a. ulimit -c unlimited; b. remove -avx2 compilation option. 435 Errorerror while loading shared libraries: libgfortran.so.3: cannot open > shared object file: No such file or directory Solution: export LD_LIBRARY_PATH=.../lib64 SarThe following is the output when run $sar -r 2 2 on my Linux PC. The %memused is more than 95%. It looks like the bottleneck of this system is memory.  FreeThe free command is the most simple and easy to use command to check memory usage on linux.  To get the memory utilization, it should be 6582304/20448492=32.19%. It is much less than 95%. The Real Memory UtilizationmLinux treats unused memory as a wasted resource and would use as much as RAM as it can to cache process/kernel information. kbbuffers is the amount of buffer space used by the kernel in kilobytes. kbcached is the amount of cached space used by the kernel in kilobytes. The buff/cache is equals kbbuffers + kbcached. To get the actual memory utilization from the output of sar, the formula would be (kbmemused - kbbuffers - kbcached)/ sum (kbmemused + kbmemfree). That is (19623112 - 598648 - 11330764 )/ (19623112 + 825380) = 37.62%. This is one is very similar with one get by the free command.
When your laptop connect to internet by wire connection and you want to connect you phone to internet too, you can setup a wifi hotpot on your laptop. This is a setup guide on Windows 7. Setup hostednetwork by command lineStart cmd with Administrator. Run the following command line. C:\>netsh wlan set hostednetwork mode=allow ssid="ssid" key="yourkey" C:\>netsh wlan show hostednetwork Setup DNS for Microsoft Virtual Miniport AdapterAt control center->Network and Internet->Network Connection, right click the new created Microsoft Virtual WiFi Miniport Adapter, set up the DNS as the one of your local connection. Share with the Local ConnectionRight click the Local Connection, click the Properties and go to the share tab. Select allow other users connect to Internet by this connection and choose the connection name as the Microsoft Virtual Miniport Adapter's name. Start hostednetworkBack to the cmd shell, and run: C:\>netsh wlan start hostednetwork Test itFind the ssid from your phone and connect to it. If you want to if your compiler, such as gcc, support the advanced instruction set. For example, you want to know if SSE4.2 is supported. You can compile and run the following program. Check the include header file cpuid.h you can find more macro definition for other instruction set. #include <cpuid.h> #include <stdio.h> void main () { unsigned int eax, ebx, ecx, edx; __get_cpuid(1, &eax, &ebx, &ecx, &edx); if (ecx & bit_SSE4_2) printf ("SSE4.2 is supported\n"); return; } Reference: http://www.drdobbs.com/parallel/fast-parallelized-crc-computation-using/229401411 You can also use the command "gcc -march=native -E -v </dev/null 2>&1 | grep cc1" to check the architecture that GCC recognizes.
System OSThe host OS: Ubuntu 16.04 The Guest OS: CentOS 7.2 Virtualbox version: 5.1.18 Connect Guest to the InternetSet VM network by VM->Settings->Network. Attached to "NAT Network". Make sure the Name is the default setting as "NatNetwork" and keep the Advanced setting unchanged, so it will choose the right Adapter Type and keep the Cable Connected. Connect the Guest and the HostSet VM network by VM->Settings->Network. Attached to "Host-only Adapter". Keep the others as default. Maybe the Name is blank. If you may meet an error like as"VERR_INTNET_FLT_IF_NOT_FOUND" when start the VM, you can fix it by manually create host-only adapter. $vboxmanage hostonlyif create The back to VM->Settings->Network. Make sure the Name of Host-only Adapter is vboxnet0. Configure Inside of the VMInside of the Guest, you just need to up the network adapter. Open Application->System Tools->Settings->Network, turn on the two Ethernet. Run ifconfig to check the network adapter information. The network adapter that ip address is 10.0.x.x would be used to connect to the Internet. The network adapter that ip address is 192.168.x.x would be used to connect with the host. Issues You May MeetIf you meet "Device not Managed", and it can't be solved even if you follow the instruction at https://askubuntu.com/questions/71159/network-manager-says-device-not-managed. You can fix it follow these steps:
关于Conjure-upConjure-up是一个Canonical公司发布的可以用来简化部署工作的一个工具。它用"spells"的概念作为软件应该怎样被部署的描述(yaml, charms 以及部署脚本)。 Conjure-up可以部署spell到三种位置:
安装Conjure-up$sudo snap install conjure-up --classic 查看发布的Spell$conjure-up 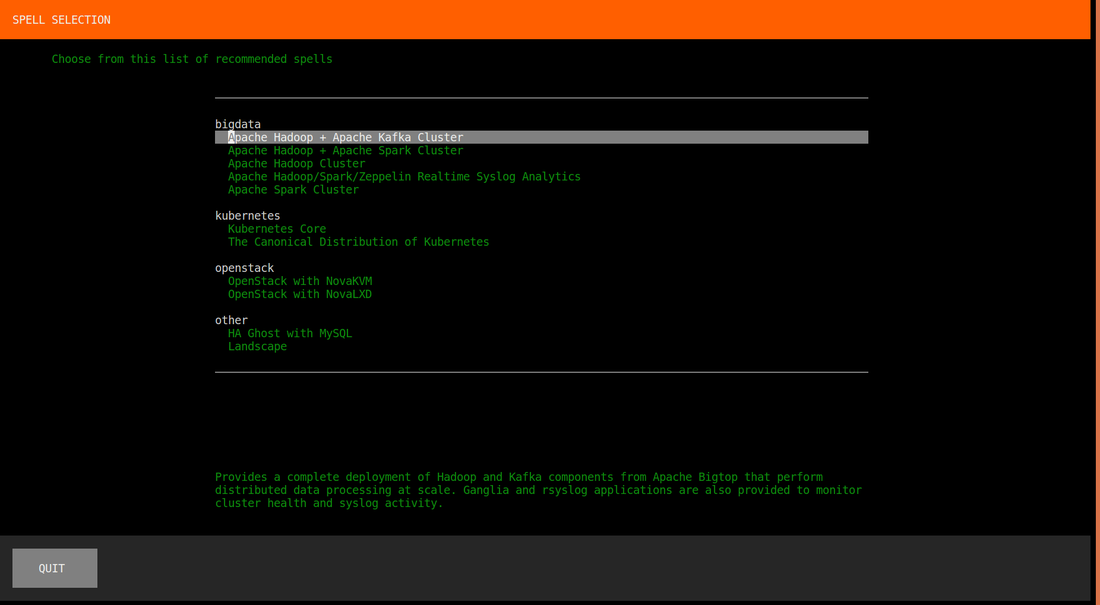 这里列出了所有公开发布的spell。你可以选择你要部署的。
|
AuthorThis is a blog that is about my works on Benchmarking Performance, Compiling Optimization, Optimize Compile, Parallel Programming, Virtualization, Container, Docker, Moby, Linuxkit, Open Source and any others. Archives
August 2018
Categories |
 RSS Feed
